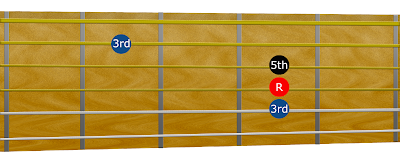
The third shape we’ll be looking at in this lesson series is the G shape.
The full range of notes in the G shape are almost impossible to play because of the stretching involved, so we need to break it down into two smaller parts to make it practical to play.
In this lesson you'll learn how to:
- create and move chords using the G shape(s)
- join the A shape and the G shape on the fretboard
- play major chords with the G shape(s)
- change major chords into minor chords with the G shape(s)
If you have some knowledge of guitar as a beginner, and I asked you to play a G chord, you would probably play this shape:
This is a G chord, played using the G shape.
The root note (G) is played on the first and sixth strings.
The third interval note (B) is played on the fifth string, and the fifth interval note (D) is played on the open fourth string, and the fretted second string.
You might also see a G played with an additional note played on the second string.This adds another fifth interval note (so in this position, it changes the note from a B to a D). Both are notes from within the G scale, so it’s all good.
The G shape is moveable up and down the fretboard
Just like the other shapes we've looked at in this lesson series, the G shapes are moveableup and down the fretboard, to allow you to play any other major chord.
If we move the G shape up a whole tone, our root note is now on the A note.
Our index finger now has to bar across the notes that were previously fretted by the nut of our guitar.
That’s quite a stretch, and even for a seasoned guitar player, is going to be impractical to play in that way. To overcome that problem, we can split our G shaped chords into two smaller shapes. Let’s take a look at how to do this.
Joining the A shape and the G shape on the fretboard
We’re going to use our knowledge of using the A shape to build our first G shape chord. If you haven't completed this lesson, I recommend you go and do this first.
Version one
We take the root note of our A shape (which is played with our middle finger) and we replace it with our index finger. In fact we play all three notes of the a chord in the A shape and play them with our index finger. Our ring finger, then plays the fifth string on the fourth fret, two frets across towards the sound hole.
Version two
The second way to play a G shape chord is to keep our index finger on the A shape notes, and add our little finger to the first string, three frets across. That’ shape's used in the blues quite a lot:In the same way we can play minor chords by flattening the third interval note by half a step, we can do the same with the G shaped chords.
Guitar practice journal
Download the Guitar Practice Tracker today. It will help to keep you motivated and give you a visual representation of your progress, and areas of focus throughout the year.
A guitar journal will enable you to:- Set personalised goals and monitor your progress
- Identify the number of hours or days you've spent on a particular skill
- Provide a quick reference to the notes and chords in a particuar key
- List the songs you know and sort by key, capo placement, artist, and chord progression
- Link directly to your favourite YouTube videos and tutorials
Download the Guitar Practice Tracker
Go to Lesson 11: The E shape guitar chord
If you found this lesson useful, and you're able to, please
Picture by PikWizard


